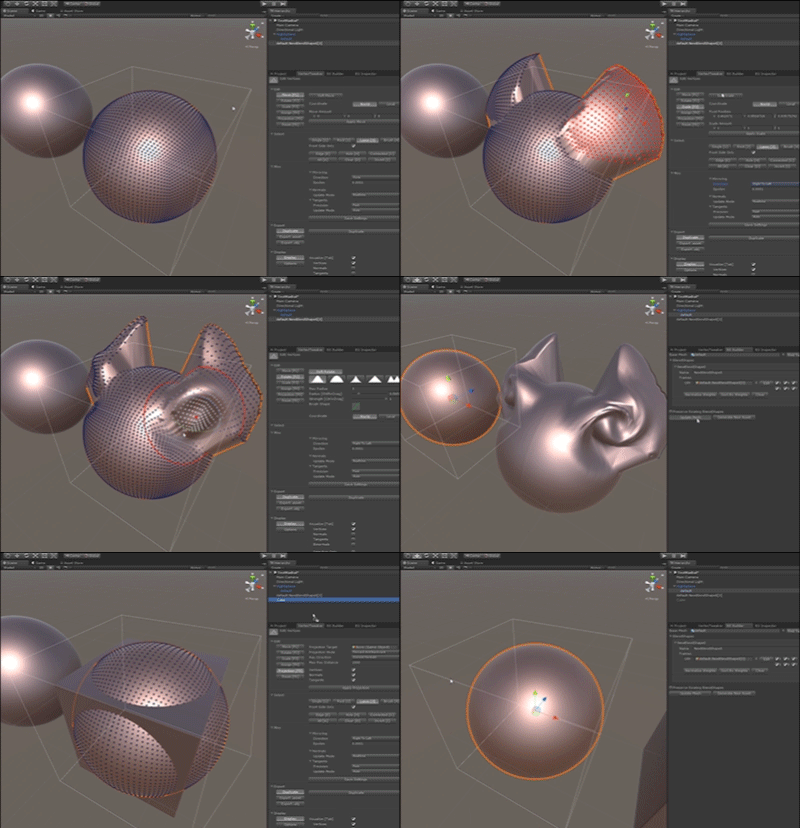
It is a tool to create blend shape on Unity. In addition to synthesizing existing models, you can also edit vertices on Unity and blend shape it.
Also, it can generate special blend shape targets such as synthesis of only normals, only the vertex position, and has the function to write an existing blend shape as a separate mesh for each target.
Unity 2017.1 or higher, Windows (64bit) or Mac, D3D11 generation and later Graphics API environment. (Please note that if the target platform is not Standalone, the function may be limited to the D3D9 generation and normal operation may stop)
How to use
- Import BlendShapeBuilder.unitypackage into the project
- “Blend Shape Builder”, “Blend Shape Inspector” and “Vertex Tweaker” are added to the Window menu.
Blend Shape Builder is a tool for authoring blend shapes, Vertex Tweaker edits vertices, Blend Shape Inspector is a tool to examine existing blend shapes and extract data.
Blend Shape Builder

When you select an object with MeshRenderer or SkinnedMeshRenderer with the Blend Shape Builder window open, the button “Add BlendShapeBuilder” will appear, so add the component.
The target object of blend shape is Mesh asset, GameObject with MeshRenderer or SkinnedMeshRenderer. (The number of vertices must be the same)
- When you press the “Find Targets” button, you will find the model with the same number of vertices as the Base Mesh in the current scene and put it in the selected state.
- We designate an object to become a morph target in “BlendShapes”.
- If you want to register an existing Mesh as a target, Drag & Drop them. When you drag & drop an object to “▼ BlendShapes” part, BlendShape is generated for each thrown object.
When you drag and drop an object to the folded part of each BlendShape (such as “▼ NewBlendShape 0” in the figure above), it is registered as a frame of that BlendShape. - When you add a frame with the “+” button, a frame is added and a corresponding Mesh is generated.
- Press “Edit” to move to Mesh editing for that frame. (Vertex Tweaker, which will be described later, opens)
- The check of V, N, T is abbreviation of Vertex, Normal, Tangent, it designates whether to include that element. For example, if only Normal is checked, it will be BlendShape where vertices are not moved and only normals are changed.
- If you want to register an existing Mesh as a target, Drag & Drop them. When you drag & drop an object to “▼ BlendShapes” part, BlendShape is generated for each thrown object.
- Press “Update Mesh” to update the current Mesh directly. “Generate New Asset” exports as a new asset without changing the current Mesh. If you check “Preserve Existing BlendShapes”, if Mesh already had a blend shape, it will carry over while adding it. (If there is BlendShape of the same name, it overwrites it with the new one)
Vertex Tweaker
It is a tool to edit vertices. It also supports editing of Skinned Mesh and can be used in general when you want to fine-tune the model, not just for blend shape. However, the only thing you can do is to move the vertices to the end, you can not increase or decrease vertices (operations that change the so-called topology).
- Edit -> Move, Rotate, Scale is the mode that moves, rotates, scales vertex according to its name
- Edit -> Assign is a so-called numeric input. Since you can mask by XYZ axes, you can use it by choosing, for example, the lower half of a sphere and checking only Y and entering 0 to make it a hemisphere.
- Edit -> Projection is a mode to project vertices to other models. Skip the ray from each vertex and move it to the point where you hit the target model. Morphing can be realized for models that do not match the number of vertices at all.
- Select is an option for vertex selection. There are also general selection methods such as rectangle selection, lasso selection, brush selection, vertex group connected to the selected vertex (Connected), selection of vertex (Edge, Hole) on the break of polygon, and so on.
- Selecting the direction with Misc -> Mirroring enables mirroring. (It must be a symmetric model)
- Misc -> Normals and Tangents are options for recalculating normals and tangents. If you have a manually edited normal and you want to keep it, you will need to change to “Manual” and not do automatic calculation. Otherwise, there should be no problem by default.
- Hold down Shift to add the selection, hold down Ctrl and subtract selection.
important point
- Edit for imported Mesh
Mesh imported from fbx file etc. is regenerated every time the project is opened. For this reason, editing for the imported Mesh is reset as it is when you reopen the project.
To avoid this you need to convert Mesh to an independent asset. “Generate New Asset” of Blend Shape Builder, or “Export -> Export .asset” of Vertex Tweaker is a command for this, exporting the model being edited as an independent asset. - On the DCC tool, if the number of matching vertices does not match on Unity
Blend Shape targets must have the same number and order of vertices as the original model. However, even though they match on the DCC tool, it may change depending on the conversion process when importing to Unity. This can happen mainly in the following cases:- There is a discontinuous normal (= hard edge)
- UV is different from model to model and there is discontinuous UV
- We allocate different materials for each face